목록 - 로테이션 응용컨트롤...
목록 로테이션에 관해 잠깐 썼었는데
새로 컨트롤을 만들었다.
아이폰에 피커? 같은... ( 좀 다를수도.. )

왼쪽 이미지는 목록로테이션 알고리즘을 응용해서 쓴것이다.
5번째 데이타가 선택중이고 2를 클릭하면 2가 5의 자리가 올때까지 데이타가 흘러간다.
4가 클릭되면 한자리만큼 내려간다.
8을 누르면 데이타는 위로 올라가면서 8이 5의 현재 위치까지 도달하면 멈춘다.
또 보여줄 갯수를 1, 3, 5, 7 로 고정해두어서 1로 하면 1개짜리 로테이션이 된다.
뒤에 바인드 된 데이타는 허용되는 갯수만큼( 제한없음 ) 가능해졌다.
저걸 쓰면.. 빠찡꼬?를 만들수 있는게야? 또는 로또당첨기를 저걸로 ? ㅡ.,ㅡ;; 또
시계를? 달력을... 일정관리 하루 ~ 24시간 툴로도???
참 많은듯... 하다.
거참 디자인 거시기... 쩝...
오른쪽은 리스트 박스다... 아래 블로깅 글에 올려놨던 그거라서.. 그닥.. 쓰게 없으므로 패쓰
Plugin 모델링을 통해 띄운 메세지 팝업창에 나타낸것으로.. 아주 아주 잘된다.
피커? 에게 현재는 라벨로만 되있지만... 우측 리스트박스처럼 컨트롤들로 컨텐츠를 제공하도록 추가기능을 넣을예정임.
그나저나. 주말엔 완성할게 있는데... 너무 피곤하다...
-- > 업데이트 ( 컨텐츠 추가, 갯수추가, 등등... )
짠~!!

뒤에 보이는 숫자 들이 바인딩된 데이타이며
그 데이타를 컨텐츠( 리스트박스처럼 제작해서 넣을수 있음. )를 직접 제작해서 넣을수 있는 부분을 추가하고 테스트를 완료 하였음.
예를 들면. 숫자 값을
라벨에는 표시 하고, checkbox는 홀수 짝수를 체크해서 짝수는 체크하고 버튼을 누르면 해당 소스 값을 메세지 박스에 보여준다.
어디 어디 쓸수 있을까?
차근 차근 시간되면 만들어봐야징...
- 일정 관리 프로그램에 써볼 예정인뎅...
- 로또를 슬롯머신처럼? 쓰는거?
- 슬롯머신게임? 어릴적 오락실에 나오던 과일그림 맞추기??
- 시계
- 또는 달력 ... 등등... 돌아가는 형태에 따라 뷰 갯수를 지정가능하니... 뒤에 데이타는 배열수만큼 지정가능하다
아! 우측 Ent는 기본 리스트뷰에 넣은거라서.. 훔.. 머.. 나중에 빼든가..
'# 2) .Net ( Vs 2005 ) > WinForm' 카테고리의 다른 글
| MDI 폼 스크롤바 없애기 (0) | 2010.03.25 |
|---|---|
| 폼에 파일 드래그앤드랍 하기 (0) | 2010.03.25 |
| 리스트 박스를 구현... (2) | 2010.03.12 |
| 트레이 구현하기... (0) | 2010.02.23 |
| 데이타 그리드 뷰에 콤보 컬럼에 대한 값 읽기... (0) | 2010.02.05 |
트리노드 검색해서 확장하기...
트리노드 검색해서 확장하기...
훈스 C#게시판에 올라왔던 질문중에 하나 답글달아본거... 그냥 기록? 해둠..
질문자는 탐색기를 만드는것 같았는데...
아래처럼 자식노드이름을 FullPath로 놓고 Text는 해당 DirectoryName Or FileName으로 두면

Text속성은 그랑께 로 위에 그림처럼 나오게 된다.
이때 탐색기 주소줄에 경로 넣듯이 그랑께 <--를 직접 넣었을때
노드확장을 하고자 하면 아래 소스처럼 하면 간단하게 된다.
위에서 차례 차례 검색하는 것보다는 해당 노드를 직접 찾고 그 부모노드를 열어주면 몇단계 안거치고 빠르게 가능해진다.
private void button1_Click(object sender, EventArgs e)
{
TreeNode[] t = treeView1.Nodes.Find(@"C:\드라이브\어쩌고\그랑께", true);
if (t.Length > 0)
{
ExpendParent(t[0]);
}
}
private void ExpendParent(TreeNode p)
{
p.Expand(); // 자기노드 확장
if (p.Parent != null)
{
ExpendParent(p.Parent); // 부모노드를 다음으로 넣어준다.
}
}
참 쉽돵.. 아침 군것질 거리로 딱이네...
'# 2) .Net ( Vs 2005 ) > 기타' 카테고리의 다른 글
| [GDI+] Matrix 객체 사용해보기... (0) | 2010.07.27 |
|---|---|
| IFormattable (0) | 2010.07.15 |
| 목록 로테이션??? (0) | 2010.03.16 |
| 사용자 정의 문자열 포멧 지정하기 ( IFormatProvider, ICustomFormatter ) (0) | 2009.08.17 |
| 인터페이스 활용? (0) | 2009.08.11 |
목록 로테이션???
간단하게 1,2,3,4,5,6,7,8,9,10 이란 목록을
1~10 ~ 다시 1부터 시작 ~ 10... 계속...
이런식으로 루프 되듯이 자료를 열람하는 로직을 만들때..
예 ) 이미지 검색... ,문자열 흘리기등...
페이지 검색등... 도 괜찮을것 같공...
아래는 Source는 위에 나열된 10개의 숫자.
보여줄 View는 TextBox 4개로 지정..

1,2,3,4 가 처음 보이고 > 누르면 다음 페이지 또는 증가 숫자만큼.. 다음 리스트가 출력
< 반대로...
간단한 알고리즘이지만... 문득.. 떠올라서 글을 써봄.
처음 문자열 흘리기 할때나. 게임 챗팅처럼 만든다고 index 값을 복잡하게 계산했던때보다는 훨씬 깔끔함..
나중에 class로 묶어두면 요기조기 써먹을데가 있을것도 같은데...
public partial class Form1 : Form
{
const int viewCnt = 4; // 보여줄 View갯수.
int totalCnt = 0;
public Form1()
{
InitializeComponent();
string[] source = this.textBox5.Text.Split(',');
View(source);
}
int[] ViewArray = new int[viewCnt] {0,1,2,3};
private void button1_Click(object sender, EventArgs e)
{
LoopItem( +4 );
}
private void button2_Click(object sender, EventArgs e)
{
LoopItem( -4 );
}
private void LoopItem(int leftRight)
{
string[] source = this.textBox5.Text.Split(',');
totalCnt = source.Length;
for (int i = 0; i < viewCnt; i++)
{
ViewArray[i] = (ViewArray[i] + leftRight) % totalCnt;
if (ViewArray[i] < 0)
{
ViewArray[i] = 10 + ViewArray[i];
}
}
View(source);
}
private void View(string[] source)
{
this.textBox1.Text = source[ViewArray[0]];
this.textBox2.Text = source[ViewArray[1]];
this.textBox3.Text = source[ViewArray[2]];
this.textBox4.Text = source[ViewArray[3]];
}
}
'# 2) .Net ( Vs 2005 ) > 기타' 카테고리의 다른 글
| IFormattable (0) | 2010.07.15 |
|---|---|
| 트리노드 검색해서 확장하기... (0) | 2010.03.17 |
| 사용자 정의 문자열 포멧 지정하기 ( IFormatProvider, ICustomFormatter ) (0) | 2009.08.17 |
| 인터페이스 활용? (0) | 2009.08.11 |
| 코드리스트 팝업 창 관련 로직. (0) | 2009.08.11 |
리스트 박스를 구현...
Plugin 프로그램을 만들다가 각 Item을 관리하려다 보니
리스트 박스로 표현이 안되서 새로 하나를 만들었다.
WPF라면 보여지는 데이타를 쉽게 바꿀수 있지만.
지금 계획이 2.0으로 우선 나만에 SDK를 만드는것이라... 2.0으로 우선 작업중이다.
Plugin 모듈은 완성이 되었고 테스트도 마쳤공...
각 plugin되는 Item을 관리해줘야 하니... 이걸 담아줄 그릇으로 이번에 제작했다.
그러나... 디자인 감각이 워낙 드러나기에... 쉐뜨..

일반 리스트 박스에 위아래 버튼만 넣은것처럼 보이겠지만..
실제로 각 아이템을 바꿀수 있는 부분이나 선택처리부분등등... 구현된것이다.
나중에 완성품 스샷 찍는 날까지... GoGo!
--> 3/13일 추가적인 스샷..

리스트 안에 TextBox, Label을 추가한모습을 볼수 있다.
오른쪽 버튼은 기본적으로 박아두었고 선택시 보이는 정도인데 추후에 뺄지 말지... 설계 과정에서 결정할 문제이다.
이로써 내부 아이템 구조를 바꾸는 것까지 구현은 되었는데 아이템을 바인딩 하기 위한 방법을 찾아야겠다
추가시 일일이 버튼 생성하고 데이타를 넣고 하는것보다는 Xaml처럼.. 뭔가 고정된 문서를 바탕으로
처리해보는게 좋을듯 싶은데... 아니면 중간에 특정 변환 객체를 두고 바인딩 시도를 하는 게 좋을듯 하다.
현재는 대리자를 통해 전달하면 리스트아이템에 넣어주게 되어 있다.
--> 추가... 변경사항
처음 생각했던걸 표현하는데 조금 미쓰가 나서리... 너무 컨트롤에 집중한 나머지.. 실제 들어오는 데이타에 대한 생각을 좀 못해서 약간에 변경사항이 생겼다.
ListBoxItem.Source 필드를 만들고 들어오는 데이타를 여기에 담고.
ListBoxItem.ContentControl ( 기존에 존재 ) 서로 Bind_SourceToControl 대리자를 통해
외부에서 묶어주는 단계를 추가하였다. 그러니 산뜻한 컨트롤이 끝났다.
실제 플러그인 모듈에 붙여봤더니 잘된다... 아하하하하하하.... 즐겁도다..
--> 3월 15일...
리스트 박스 컨트롤이 말썽이 생겼었는데 퇴근후 집에와서 주석처리를 동반하면서 디버깅에 들어갔더니 원인을 찾았으나
왜 그런지는 모르겠다.
public partial class ListBox : UserControl, IUpdateListBox
{
/// <summary>
/// 데이타 소스 원본
/// </summary>
//protected IList<ListBoxItem> dataSource = new List<ListBoxItem>();
// 추가되면 디자인모드상에서 에러가...
protected IList<ListBoxItem> dataSource = null;
...
}
null을 주고 처리하면 된다..
넘겨받아서 처리 하기때메 굳이 생성할 필요는 없지만.. 저 구문으로 사용하면
디자인 모드에서 사이즈 변경시 vs2008이 죽어버린다.
뭐 잡았으니.. 모두 원상태로... 개발은 계속...

내부에 ToolBox를 넣은 스샷... 마지막 스샷일듯...
이제 플러그인 메인 프로그래밍에 중점을 두고...
'# 2) .Net ( Vs 2005 ) > WinForm' 카테고리의 다른 글
| 폼에 파일 드래그앤드랍 하기 (0) | 2010.03.25 |
|---|---|
| 목록 - 로테이션 응용컨트롤... (0) | 2010.03.19 |
| 트레이 구현하기... (0) | 2010.02.23 |
| 데이타 그리드 뷰에 콤보 컬럼에 대한 값 읽기... (0) | 2010.02.05 |
| ListView에 컬럼 동적 제어... (0) | 2010.02.05 |
트레이 구현하기...
에... 늘 쓰던건데... 그냥 블로그에 기록해봄
1. 도구상자에서 NotifyIcon 컨트롤을 얹어놓고.
더블클릭이벤트 -> Form.Show();
2. contextMenu 컨트롤도 하나 올리고 -> 종료하기를 구현한다.
3. NotifyIcon에 사용할 아이콘 이미지 하나를 제작하고 컨트롤에 등록해준다.
4. bool Flag하나 선언하고 CheckBox하나를 더 등록한다.
5. 나머진 구현만 하면 되는데... 작업표시줄에 아이콘활성화는 폼을 Hide하고 NotifyIcon.Visible = true; 하면된다.
구현 시 동작은 폼이 닫힘 버튼을 누르거나 X를 눌러 종료시 -> 최소화라는 CheckBox 의 체크값에 따라 되고 안되고를 처리 하며 bClose는 FormClosing이벤트의 e.Cancel 값을 토글하는 목적으로 사용된다.
소스를 아래 붙힌다.
수정 : 2010,2,24일 doClose는 삭제처리..
-> 로직을 생각해보니 doClose는 필요없었던듯 함.
생기게된 이유는 원래 목적이 그거였는데 중간에 외부에서 입력시켜주는 checkBox를 추가하면서 doClose가 필요없는데도... 남겨두었던것...
public partial class MainForm : Form
{
//폼 닫히는 지 확인값.
bool doClose = false;
public MainForm()
{
InitializeComponent();
}
// 닫기버튼으로 폼을 닫는다
// 이때 checkBox의 값은 Closing될때 체크되어 진짜 닫을지 최소화 하고 작업표시줄에 나타낼지가 결정되므로
// 여기서는 무시한다.
private void button3_Click(object sender, EventArgs e)
{
this.Hide();
doClose = false;
this.Close();
}
// 폼이 처음 Show되는 위치를 지정한다. 작업표시줄 바로위에 표시되게 값을 지정함.
protected override void OnShown(EventArgs e)
{
this.Left = Screen.PrimaryScreen.WorkingArea.Width - this.Width;
this.Top = Screen.PrimaryScreen.WorkingArea.Height - this.Height;
notifyIcon1.Visible = false;
base.OnShown(e);
}
// 폼이 닫힐때 최소화 체크값에 따라 닫힐지 최소화가 될지가 결정된다.
// bClose값이 e.Cancel값으로 그냥 닫는 것을 캔슬 해준다.
protected override void OnFormClosing(FormClosingEventArgs e)
{
if (checkBox1.Checked)
{
doClose = true;
this.Hide();
notifyIcon1.Visible = true;
}
e.Cancel = doClose;
e.Cancel = checkBox1.Checked; // 이렇게 바뀜.
base.OnFormClosing(e);
}
폼이 완전 닫혔으면 NotifyIcon을 정리해준다 안그러면 작업표시줄에 살아있는 것 처럼 남게 된다.
protected override void OnFormClosed(FormClosedEventArgs e)
{
this.notifyIcon1.Visible = false;
this.notifyIcon1.Dispose();
this.notifyIcon1 = null;
base.OnFormClosed(e);
}
// 닫기버튼 클릭시...
private void button4_Click(object sender, EventArgs e)
{
this.Hide();
doClose = true;
notifyIcon1.Visible = true;
}
// ContextMenu에 종료하기 클릭시...
private void 종료하기ToolStripMenuItem_Click(object sender, EventArgs e)
{
doClose = false;
this.checkBox1.Checked = false;
this.Close();
}
// NotifyIcon을 더블클릭시 프로그램 Show기능
private void notifyIcon1_DoubleClick(object sender, EventArgs e)
{
doClose = true;
notifyIcon1.Visible = false;
this.Show();
}
}
대충 훑어보았음... 늘 쓰는거라서... 정말 많이 필요해지면... 중간에 따로 관리 객체를 만들어서 프레임웍에 넣을까?
'# 2) .Net ( Vs 2005 ) > WinForm' 카테고리의 다른 글
| 목록 - 로테이션 응용컨트롤... (0) | 2010.03.19 |
|---|---|
| 리스트 박스를 구현... (2) | 2010.03.12 |
| 데이타 그리드 뷰에 콤보 컬럼에 대한 값 읽기... (0) | 2010.02.05 |
| ListView에 컬럼 동적 제어... (0) | 2010.02.05 |
| 텍스트박스 라인넘버 넣기! (0) | 2009.10.26 |
데이타 그리드 뷰에 콤보 컬럼에 대한 값 읽기...
훈스 게시판에 올라온 질문에 대한 답변으로...
그리드 뷰의 콤보컬럼을 추가하고 값을 읽는 방법에 대해 살짝쿵!!
음 그리드뷰 관련해서 카테고리를 따로 만들어놓고 쓸까낭... 지금까지 만든 아답타 클래스도 공개를 ...? 험...
DataGridView dgv = new DataGridView();
DataGridViewComboBoxColumn dgvCombo = new DataGridViewComboBoxColumn();
dgvCombo.Items.Add("a");
dgvCombo.Items.Add("b");
dgvCombo.Items.Add("c");
dgvCombo.HeaderText = "콤보컬럼";
dgv.Columns.Add(dgvCombo);
this.Controls.Add(dgv);
dgv.Rows.Add(1);
((DataGridViewComboBoxCell)dgv.Rows[0].Cells[0]).Value = "b";
MessageBox.Show(((DataGridViewComboBoxCell)dgv.Rows[0].Cells[0]).Value.ToString());
'# 2) .Net ( Vs 2005 ) > WinForm' 카테고리의 다른 글
| 리스트 박스를 구현... (2) | 2010.03.12 |
|---|---|
| 트레이 구현하기... (0) | 2010.02.23 |
| ListView에 컬럼 동적 제어... (0) | 2010.02.05 |
| 텍스트박스 라인넘버 넣기! (0) | 2009.10.26 |
| 디버그윈도우를 만들어서 적용함. (0) | 2009.10.16 |
ListView에 컬럼 동적 제어...
훈스 C#게시판에 올라온 질문중 ListView 컬럼을 동적으로 처리 할수 있는가에 대한 문의.
해당 컬럼을 직접 제어 할수 있는 속성은 없었고 컬럼 자체를 삭제, 추가 등으로 적용이가능하였다. 이때 Index위치가
바뀌는 적절한 Index 셋팅하는 로직도 추가되면 좋을듯 한다.
/*
콤보 1개, ListView 1개
ListView.View = Detail; 컬럼은 그냥 디자이너에서 추가!
콤보에 Items 에는 ListView에 사용한 컬럼명을 등록함.
아래 소스는 콤보 선택시 선택된 ListView 컬럼을 뺌으로써 보이지 않게 처리 할수 있음.
*/
public partial class Form1 : Form
{
public Form1()
{
InitializeComponent();
}
ColumnHeader oldch = null;
private void comboBox1_SelectedIndexChanged(object sender, EventArgs e)
{
if (oldch != null)
{
listView1.Columns.Add(oldch);
oldch = null;
}
oldch = listView1.Columns[Convert.ToInt16(comboBox1.SelectedItem)];
listView1.Columns.Remove(oldch);
}
}
'# 2) .Net ( Vs 2005 ) > WinForm' 카테고리의 다른 글
| 트레이 구현하기... (0) | 2010.02.23 |
|---|---|
| 데이타 그리드 뷰에 콤보 컬럼에 대한 값 읽기... (0) | 2010.02.05 |
| 텍스트박스 라인넘버 넣기! (0) | 2009.10.26 |
| 디버그윈도우를 만들어서 적용함. (0) | 2009.10.16 |
| 작업트레이위에 스르륵!! 나타나는 폼! (0) | 2009.10.06 |
텍스트박스 라인넘버 넣기!
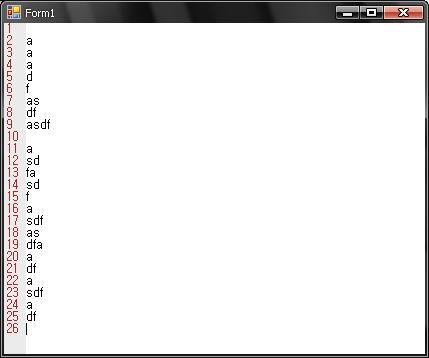
스크롤 처리도 안되있고 글자 폰트는 9pt 밖에 라인에 맞게 그릴순 없는 소스지만
조금만더 노가다를 하묜... 비슷하게 구현되지 않을까 ? 싶어서 일단... 등록해둠.
문제점 : Textbox에 폰트크기와 판넬에 폰트크기가 다르게 표시되는 점.
-> 이래서 글자 줄간격이 차이가 나는데 아래 9pt는 노가다로 1.79라는 수를 구해서 라인별로 곱하는데 다른 크기에서는 다른값이 요구되므로 각 값마다 찾을라면... 이건 미친 노가다라고 보임.
문제점 : Textbox에서 스크롤 되는 위치값 구해서 라인넘버 그려지는 영역에 대한 처리도 해야되는데... 그게 없음.
활용 가치? 그닥 없음. 한번 해본것이기 때문에...
using System;
using System.Collections.Generic;
using System.ComponentModel;
using System.Data;
using System.Drawing;
using System.Text;
using System.Windows.Forms;
namespace TextBox_LineNumber
{
public partial class Form1 : Form
{
public Form1()
{
InitializeComponent();
font = this.textBox1.Font;
}
Font font = null;
private void Form1_Paint(object sender, PaintEventArgs e)
{
int totalLine = this.textBox1.Lines.Length;
for (float loop = 1f; loop <= totalLine; loop++)
{
SizeF sizef = e.Graphics.MeasureString(loop.ToString(), font);
//e.Graphics.DrawString(loop.ToString(), font, Brushes.Brown, 0f, (loop - 1f) * sizef.Height /*); // */ + 1.79f );
e.Graphics.DrawString(loop.ToString(), font, Brushes.Brown, 0f, (loop - 1f) * this.textBox1.Font.GetHeight() - (loop-1)* 1.79f); // 9pt에서 되는놈
}
}
private void textBox1_TextChanged(object sender, EventArgs e)
{
this.Invalidate(new Rectangle(0, 0, this.Padding.Left, this.Height));
}
}
}
'# 2) .Net ( Vs 2005 ) > WinForm' 카테고리의 다른 글
| 데이타 그리드 뷰에 콤보 컬럼에 대한 값 읽기... (0) | 2010.02.05 |
|---|---|
| ListView에 컬럼 동적 제어... (0) | 2010.02.05 |
| 디버그윈도우를 만들어서 적용함. (0) | 2009.10.16 |
| 작업트레이위에 스르륵!! 나타나는 폼! (0) | 2009.10.06 |
| 가상메서드 - 오버라이드... (0) | 2009.10.06 |
Vs 2008 처리...
다운로드~~
'# 2) .Net ( Vs 2005 )' 카테고리의 다른 글
| 바둑판그리기 (0) | 2009.05.01 |
|---|
디버그윈도우를 만들어서 적용함.
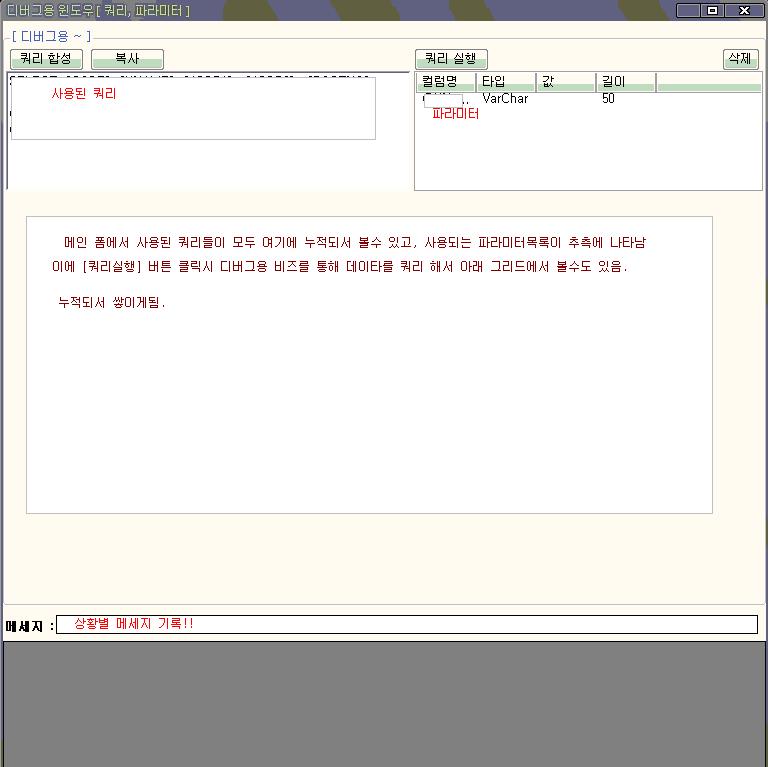
전에도 만들어 썼지만. 이번 플젝에서는 좀더 다루기 쉽게 만들었음.
손수 만든 개발프레임웍에서 쿼리와 파라미터를 중간에 필터링해서 디버그폼으로 전달해주고
디버그 폼은 이를 가지고 있게 됨. 이때 이 디버그폼에서 [쿼리 실행]버튼 을 눌렀을때,
디버그 비즈를 이용해서 쿼리와 파라미터를 이용해 쿼리를 볼수 있게 됨.
프로그램 디버그모드에서는 항시 떠있으며 쿼리와 파라미터를 받을 대기 상태로 폼 우측에 대기 하게 됨.
DB와 통신하는 순간 디버그윈도우에서는 이를 받아 기록하게 됨.
사용한 개발 프레임웍은 직접 .net 2.0프레임웍으로 만들었으며 dll구성은 7가지로 되있음.
여기에 Biz단과 Form과는 별도의 dll로 구성되있고 디버그폼은 Form Dll에 속함.
Biz에서 발생되는 쿼리들은 모두 디버그 폼으로 대리자를 통해 전달하게 됨.
[ 장점 ]
설치 후 특정 권한이 있는 사용자로 로그인 시켰을때만 볼수 있게 만들어놔서
프로그램 유지보수에 도움이 될듯 함.
디버깅 툴이 딱히 없어도 폼에서 사용되는 쿼리와 파라미터를 직관적으로 볼수 있음.
또 쿼리 합성을 통해 사용되는 쿼리와 파라미터를 조합하여 복사 후 SQL의 쿼리분석기를 통해
쿼리를 바로 확인 가능함!
'# 2) .Net ( Vs 2005 ) > WinForm' 카테고리의 다른 글
| ListView에 컬럼 동적 제어... (0) | 2010.02.05 |
|---|---|
| 텍스트박스 라인넘버 넣기! (0) | 2009.10.26 |
| 작업트레이위에 스르륵!! 나타나는 폼! (0) | 2009.10.06 |
| 가상메서드 - 오버라이드... (0) | 2009.10.06 |
| 그리드뷰 각 Row색 바꾸기. (1) | 2009.09.25 |
